Recently, I received a used HumanWare BrailleNote Apex BT 32 from the United States. This blog post is a collection of personal notes about connecting the device to my laptop running FreeBSD 16.0-CURRENT (main).
The post includes images and tables. If you have difficulty accessing it, I can provide a plain-text version by email or through the FreeBSD accessibility mailing list.
This is not yet about using the Apex as a real Braille display. These are just the first steps to:
- Establish communication between the device and FreeBSD.
- Receive characters from the device and read them on FreeBSD.
- Send characters from the laptop to the device.
In the future, I will use this device to investigate and hopefully develop a Braille display subsystem for FreeBSD as part of the Vision Accessibility project, thanks to the sponsorship of the FreeBSD Foundation.
The HumanWare BrailleNote Apex
The device is a BrailleNote Apex from the BrailleNote family, developed by HumanWare. The original HumanWare store page is still available through the Internet Archive and describes the device’s features.
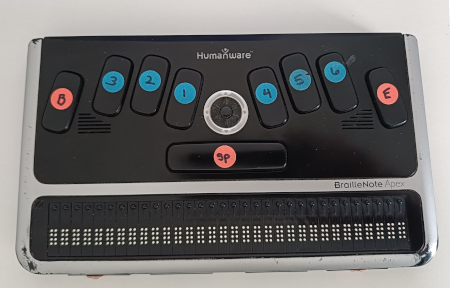
Top view
The device has six Braille input keys, corresponding to dots 1-6, a BACKSPACE key, a SPACE key and an ENTER key. A Scroll Wheel sits in the middle, with a button and the ability to turn the wheel to the right and to the left.
The display has 32 Braille cells, and each cell has 8 dots. The two additional dots at the bottom are used for computer features. For example, they could indicate the cursor position or the text selected for a copy and paste.
Built-in speakers for audio output are available. They provide sound output in addition to the tactile Braille output.
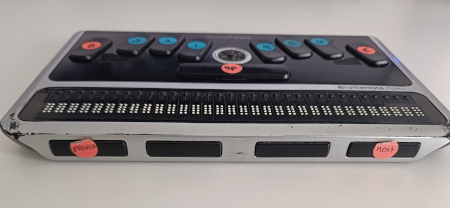
Front view
There are 4 thumb keys: PREVIOUS, BACK, ADVANCE and NEXT.
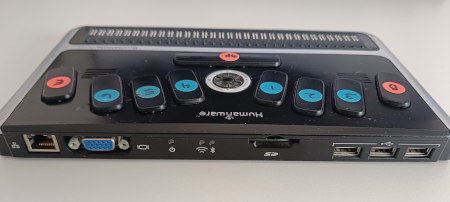
Rear view
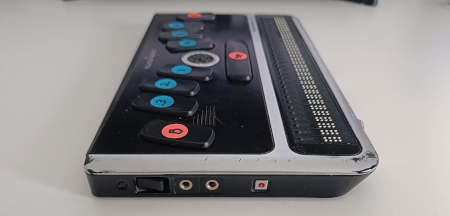
Left side
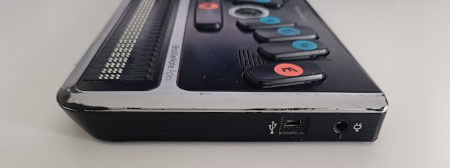
Right side
There is one mini USB 2.0 port, the one I use to connect the device to the laptop running FreeBSD.
The device is much more than a Braille display used as a peripheral for reading and writing Braille. The Apex is what is commonly known as a Braille notetaker.
It runs its own operating system and provides a collection of applications similar to those found on a laptop, but without a conventional graphical user interface. Instead, users interact with the device through speech and Braille.
The Apex runs Windows CE 6.0 and uses KeySoft as its main software environment. KeySoft provides a text-based, menu-driven interface and several applications, including a word processor, an email client, a web browser, a chat application, and other utilities.
Braille
To use the device effectively, you need to know Braille. Both the keys used for writing and the dots used for reading are based on Braille.
Learn Braille
Personally, I used a smartphone app to learn Braille. After a couple of hours, I had completed the lessons and challenges, and I was able to start reading the Braille cells on the Apex.
To practice further and improve my Braille skills, I also created and used LearnBraille. It is a simple Lua script that generates quizzes for practicing Braille characters using /devel/liblouis.
% ./learnbraille.lua
LearnBraille 0.0.1

Conversion table: --forward unicode.dis,it-it-comp6.utb
Black chars:      abcdefghijklmnopqrstuvwxyzABCDEFGHIJKLMNOPQRSTUVWXYZ0123456789
Repeat a char:    2

Question [1/124]: |⠨⠇|? y
	Error! The char is:  L

Question [2/125]: |⠨⠓|? H
	Correct!

Question [3/125]: |⠨⠛|? G
	Correct!

Question [4/125]: |⠨⠝|?
...
I also used the Apex’s Word Processor to practice writing. We will see some screenshots later in this post.
Notation
I cannot assume that every reader has a Braille font installed. If you want to check how Braille patterns (characters) are represented, you can refer to the Wikipedia Braille Patterns page or the ISO Braille Patterns pdf.
For this reason, I will not use Unicode Braille characters in this post. Instead, I will represent each character using its corresponding dot numbers enclosed in braces, along with the relevant keys on the Apex keyboard.
For example:
t {2345}v {1236}Main Menu: SPACE + {123456}Option: SPACE + o {135}
Commands to be executed in the FreeBSD terminal will be preceded by %
or #, as usual:
% command 1
# command 2
VGA Output
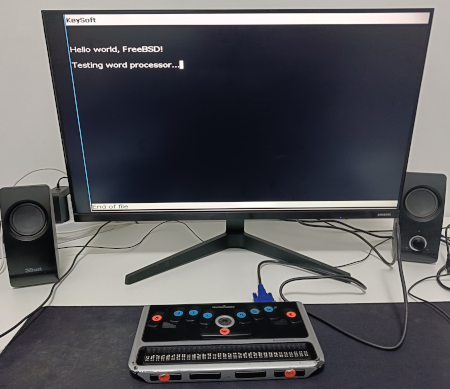
One particularly interesting feature of the Apex is its VGA output. By connecting an external monitor, you can see what is happening on the device, including the information shown on the Braille cells or spoken by the speech synthesizer. This is useful for sighted people who want to follow what the user is doing, such as teachers and support staff.
I used the VGA output to better understand how the device works and to configure its Braille settings. In particular, I changed the English Braille setting from Grade 2, which uses contracted Braille, to Grade 1, which displays each letter individually. I prefer Grade 1 because it makes the full spelling of English words easier for me to read.
Enabling the VGA output
First, connect the Apex to an external monitor using a VGA cable. There are then two ways to enable the output.
1. Navigating through the menus
- Press
SPACE + {123456}to open the Main Menu. - Press
Next ThumborSPACErepeatedly until you reach Options Menu. - Press
ENTERto open the Options Menu. - Press
Next ThumborSPACErepeatedly until you reach Visual Display. - Press
ENTERto check the current setting. - If the current setting is Visual Display off, press
v {1236}to enable the VGA output. - The Apex announces Visual Display VGA.
- Press
ENTERto confirm and return to the Main Menu.
2. Using shortcuts
- Press
SPACE + {123456}to open the Main Menu. - Press
SPACE + o {135}to open the Options Menu. - Press
v {1236}to check the current VGA status. - If the current setting is Visual Display off, press
v {1236}again to enable the VGA output. - The Apex announces Visual Display VGA.
- Press
ENTERto confirm and return to the Main Menu.
In my case, I also had to open the monitor’s on-screen menu and change its input source from HDMI to Analog.
The following screenshot shows the Apex connected to an external monitor with the Word Processor open.
Using the Apex as a Braille display with FreeBSD
For the Vision Accessibility project, what interests us is making the device work as a “simple” Braille display. In this mode, the Apex communicates with an external computer and acts as a terminal for a screen reader:
- It receives text from the computer and “writes” it on the Braille cells.
- It sends the computer the text typed on its keys.
However, this first exploration has a narrower goal. At this stage, I am not writing a driver or a complete screen-reader solution: I am simply trying to understand how the device communicates and how to send and receive data.
The goal for now is to connect the Apex to FreeBSD and exchange raw byte messages. This groundwork will be useful later, when I design a subsystem for Braille displays. The Apex driver will be its first use case.
Setting up the Apex
Fortunately, the Apex provides a mode designed specifically to work as a “simple” Braille display: the Screen Reader Terminal.
There are two ways to enable the Screen Reader Terminal.
1. Navigating through the menus
- Press
SPACE + {123456}to open the Main Menu. - Press
Next ThumborSPACErepeatedly until you reach Terminal for Screen Reader. - Press
ENTERto check the current setting. - If the current setting is Braille Terminal port currently USB client,
press
s {234}to select serial communication via USB. The Apex announces USB Serial. - Press
ENTERto confirm.
2. Using shortcuts
- Press
SPACE + {123456}to open the Main Menu. - Press
t {2345}to go directly to the Terminal for Screen Reader setting and hear the current value. - If the current setting is Braille Terminal port currently USB client,
press
s {234}to select serial communication via USB. The Apex announces USB Serial. - Press
ENTERto confirm.
Attaching the Apex to FreeBSD
Connect the Apex to your FreeBSD laptop via USB.
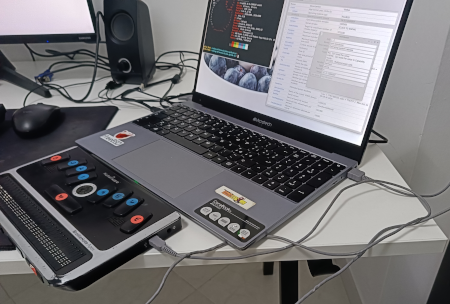
Now run dmesg(8):
...
ugen0.5: <Generic Manufacturer (PROTOTYPE--Remember to change idVendor) Generic Serial (PROTOTYPE--Remember to change idVendor)> at usbus0
uipaq0 on uhub1
uipaq0: <Generic Manufacturer (PROTOTYPE--Remember to change idVendor) Generic Serial (PROTOTYPE--Remember to change idVendor), class 0/0, rev 2.00/0.00, addr 4> on usbus0
FreeBSD recognizes the device and attaches it to the uipaq(4) driver.
This makes sense, since the Apex runs Windows CE 6.0.
The driver source code is in sys/dev/usb/serial/uipaq.c.
We can also inspect the device with sysctl(8):
% sysctl dev.uipaq
dev.uipaq.0.ttyports: 1
dev.uipaq.0.ttyname: U0
dev.uipaq.0.%iommu:
dev.uipaq.0.%parent: uhub1
dev.uipaq.0.%pnpinfo: vendor=0x045e product=0x00ce devclass=0x00 devsubclass=0x00 devproto=0x00 sernum="28171312-0031-0000-0000-000000000000" release=0x0000 mode=host intclass=0xff intsubclass=0xff intprotocol=0xff ttyname=U0 ttyports=1
dev.uipaq.0.%location: bus=0 hubaddr=1 port=2 devaddr=5 interface=0 ugen=ugen0.5
dev.uipaq.0.%driver: uipaq
dev.uipaq.0.%desc: Generic Manufacturer (PROTOTYPE--Remember to change idVendor) Generic Serial (PROTOTYPE--Remember to change idVendor), class 0/0, rev 2.00/0.00, addr 4
dev.uipaq.%parent:
The same information is available with devinfo -rv | grep uipaq.
The uipaq(4) manual page tells us that data transfer with the device goes through the ucom(4) interface. Indeed, listing the device nodes shows the serial device:
% ls -l /dev/cuaU* /dev/ttyU*
crw-rw----  1 uucp dialer 0x1a5 Oct 12 23:44 /dev/cuaU0
crw-rw----  1 uucp dialer 0x1a6 Oct 12 23:44 /dev/cuaU0.init
crw-rw----  1 uucp dialer 0x1a7 Oct 12 23:44 /dev/cuaU0.lock
crw-------  1 root wheel  0x1a2 Oct 12 23:44 /dev/ttyU0
crw-------  1 root wheel  0x1a3 Oct 12 23:44 /dev/ttyU0.init
crw-------  1 root wheel  0x1a4 Oct 12 23:44 /dev/ttyU0.lock
The device node we will use is /dev/cuaU0.
It belongs to the dialer group, so a regular user needs to be a member of that
group to open it.
# pw groupmod dialer -m <user>Inspecting the USB descriptors
Every USB device describes itself to the host with a set of descriptors. Reading them tells us who the device is, which interfaces and endpoints it exposes, and which driver owns them. This is the information we need to understand how to talk to the Apex.
The dmesg output gave us the device name, ugen0.5.
First, we confirm it with usbconfig(8):
# usbconfig list
...
ugen0.5: <Generic PPC Flash device Microsoft Corp.> at usbus0, cfg=0 md=HOST spd=HIGH (480Mbps) pwr=ON (0mA)
The Apex is ugen0.5 and it is connected at high speed (480 Mbps).
“Generic PPC Flash device Microsoft Corp.” is the name FreeBSD associates with
its vendor and product ID.
Next, we read the device descriptor to identify the device:
# usbconfig -d ugen0.5 dump_device_desc
ugen0.5: <Generic PPC Flash device Microsoft Corp.> at usbus0, cfg=0 md=HOST spd=HIGH (480Mbps) pwr=ON (0mA)

  bLength = 0x0012
  bDescriptorType = 0x0001
  bcdUSB = 0x0200
  bDeviceClass = 0x0000  <Probed by interface class>
  bDeviceSubClass = 0x0000
  bDeviceProtocol = 0x0000
  bMaxPacketSize0 = 0x0040
  idVendor = 0x045e
  idProduct = 0x00ce
  bcdDevice = 0x0000
  iManufacturer = 0x0001  <Generic Manufacturer (PROTOTYPE--Remember to change idVendor)>
  iProduct = 0x0002  <Generic Serial (PROTOTYPE--Remember to change idVendor)>
  iSerialNumber = 0x0003  <28171312-0031-0000-0000-000000000000>
  bNumConfigurations = 0x0001
The device is USB 2.0 (bcdUSB = 0x0200).
Its vendor ID is 0x045e (Microsoft) and its product ID is 0x00ce.
The manufacturer and product strings look like placeholders left by the
manufacturer.
The device class is defined by the interface, not by the device, and there is a
single configuration.
Then we read the configuration descriptor to see interfaces and endpoints:
# usbconfig -d ugen0.5 dump_curr_config_desc
ugen0.5: <Generic PPC Flash device Microsoft Corp.> at usbus0, cfg=0 md=HOST spd=HIGH (480Mbps) pwr=ON (0mA)


 Configuration index 0

    bLength = 0x0009
    bDescriptorType = 0x0002
    wTotalLength = 0x0020
    bNumInterfaces = 0x0001
    bConfigurationValue = 0x0001
    iConfiguration = 0x0000  <no string>
    bmAttributes = 0x00c0
    bMaxPower = 0x0000

    Interface 0
      bLength = 0x0009
      bDescriptorType = 0x0004
      bInterfaceNumber = 0x0000
      bAlternateSetting = 0x0000
      bNumEndpoints = 0x0002
      bInterfaceClass = 0x00ff  <Vendor specific>
      bInterfaceSubClass = 0x00ff
      bInterfaceProtocol = 0x00ff
      iInterface = 0x0000  <no string>

     Endpoint 0
        bLength = 0x0007
        bDescriptorType = 0x0005
        bEndpointAddress = 0x0081  <IN>
        bmAttributes = 0x0002  <BULK>
        wMaxPacketSize = 0x0200
        bInterval = 0x0000
        bRefresh = 0x0000
        bSynchAddress = 0x0000

     Endpoint 1
        bLength = 0x0007
        bDescriptorType = 0x0005
        bEndpointAddress = 0x0002  <OUT>
        bmAttributes = 0x0002  <BULK>
        wMaxPacketSize = 0x0200
        bInterval = 0x0000
        bRefresh = 0x0000
        bSynchAddress = 0x0000
The device has a single interface, whose class, subclass and protocol are all
0xff (vendor specific).
It has two bulk endpoints: one IN (0x81) and one OUT (0x02), both with
512-byte packets.
The device is also self-powered (bmAttributes = 0xc0, bMaxPower = 0).
Other usbconfig commands do not add new information.
usbconfig -d ugen0.5 dump_info prints only the header line already shown by
the other commands.
usbconfig -d ugen0.5 dump_all_config_desc and
usbconfig -d ugen0.5 dump_all_desc repeat the descriptors already shown,
because the device has a single configuration.
Finally, we check which driver owns the interface.
The show_ifdrv command shows the driver attached to each interface:
# usbconfig -d ugen0.5 show_ifdrv
ugen0.5: <Generic PPC Flash device Microsoft Corp.> at usbus0, cfg=0 md=HOST spd=HIGH (480Mbps) pwr=ON (0mA)
ugen0.5.0: uipaq0: <Generic Manufacturer (PROTOTYPE--Remember to change idVendor) Generic Serial (PROTOTYPE--Remember to change idVendor),
Interface 0 of ugen0.5 is claimed by uipaq(4), which confirms what we saw in
dmesg.
Serial port settings
Since the Apex appears as a serial device, we should also inspect the port settings before using it:
% stty -f /dev/cuaU0 -a
speed 9600 baud; 0 rows; 0 columns;
lflags: icanon isig iexten echo echoe -echok echoke -echonl echoctl
	-echoprt -altwerase -noflsh -tostop -flusho -pendin -nokerninfo
	-extproc
iflags: -istrip icrnl -inlcr -igncr ixon -ixoff ixany imaxbel -ignbrk
	brkint -inpck -ignpar -parmrk iutf8
oflags: opost onlcr -ocrnl tab0 -onocr -onlret
cflags: cread cs8 -parenb -parodd hupcl clocal -cstopb -crtscts -dsrflow
	-dtrflow -mdmbuf rtsdtr
cchars: discard = ^O; dsusp = ^Y; eof = ^D; eol = <undef>;
	eol2 = <undef>; erase = ^?; erase2 = ^H; intr = ^C; kill = ^U;
	lnext = ^V; min = 1; quit = ^\; reprint = ^R; start = ^Q;
	status = ^T; stop = ^S; susp = ^Z; time = 0; werase = ^W;
These are the default settings FreeBSD applies to a serial device: 9600 baud, 8 data bits, no parity, no hardware flow control, canonical input mode, echo, and CR/NL translation. They are provided by FreeBSD and should not be assumed to reflect the Apex’s own configuration.
Section 2.7.3.1, Connecting a Terminal to the Serial Port, of the Apex manual specifies the following settings for a USB Client serial connection:
bit rate: 38400 bps.
parity: none.
data bits: 8.
stop bits: 1.
However, these settings are not necessarily applicable to USB serial
communication with FreeBSD.
I tried changing the baud rate to 1200 using cu -l /dev/cuaU0 -s 1200,
and usbdump showed the same bytes received from the Apex as with the other
speeds.
One possible explanation is that the data is handled by the USB subsystem rather than by a conventional hardware UART, so changing the baud rate may not affect the actual transfer speed. This is only a hypothesis, however, and would require further investigation, in particular for the transmit direction.
In most of my tests with the Apex I left the default FreeBSD settings unchanged. Occasionally, problems appeared when starting the communication, especially when sending data. A possible temporary solution is described below.
Troubleshooting
Note (to investigate). If, after a few seconds, dmesg reports that the device has disconnected:
ugen0.5: <Generic Manufacturer (PROTOTYPE--Remember to change idVendor) Generic Serial (PROTOTYPE--Remember to change idVendor)> at usbus0 (disconnected)
uipaq0: at uhub1, port 2, addr 4 (disconnected)
uipaq0: detached
set the serial terminal again on the Apex:
Main Menu SPACE + {123456} -> t {2345} -> s {234} -> ENTER.
Tip. If dmesg shows a device other than “uipaq0 on uhub1”, set USB serial again on the Apex with the same sequence. Most likely the Terminal for Screen Reader is set to Bluetooth or USB Client.
Receiving data from the Apex on FreeBSD
The next step is to open the FreeBSD terminal and inspect the data generated when keys are pressed on the Apex.
Test 1
- In a terminal (T1) we run the
% cu -l /dev/cuaU0 -s 9600command. - Then, on the Apex, we type:
a {1} SPACE b {12} SPACE c {14} SPACE d {145}.
Output:
% cu -l /dev/cuaU0 -s 9600
can't open log file /var/log/aculog.
Connected
�����	��
cu is receiving data from the Apex via USB Serial port, but it is probably
made of non-printable characters.
I tried to close cu in T1 with Enter followed by ~., but everything was
blocked.
So I opened a new terminal (T2) and ran:
% pkill cuAt this point cu in T1 terminated.
Test 2
Now the goal is to understand which data the Apex sends to FreeBSD.
- In T1 we run the same command again,
% cu -l /dev/cuaU0 -s 9600. - In a new terminal (T3) we run
# usbdump -i usbus0 -f 5 -v. - Now we type again on the Apex:
a {1} SPACE b {12} SPACE c {14} SPACE d {145}.
In T1 we get the same output as before.
In T2 we run pkill cu to close cu.
In T3 we get:
# usbdump -i usbus0 -f 5 -v
10:35:39.678250 usbus0.5 DONE-BULK-EP=00000081,SPD=HIGH,NFR=1,SLEN=4,IVAL=0,ERR=0
 frame[0] READ 2 bytes
 0000  80 01 -- -- -- -- -- --  -- -- -- -- -- -- -- --  |..              |
10:35:39.678262 usbus0.5 SUBM-BULK-EP=00000081,SPD=HIGH,NFR=1,SLEN=0,IVAL=0
 frame[0] READ 1024 bytes
10:35:42.156031 usbus0.5 DONE-BULK-EP=00000081,SPD=HIGH,NFR=1,SLEN=4,IVAL=0,ERR=0
 frame[0] READ 2 bytes
 0000  81 00 -- -- -- -- -- --  -- -- -- -- -- -- -- --  |..              |
10:35:42.156044 usbus0.5 SUBM-BULK-EP=00000081,SPD=HIGH,NFR=1,SLEN=0,IVAL=0
 frame[0] READ 1024 bytes
10:35:43.429039 usbus0.5 DONE-BULK-EP=00000081,SPD=HIGH,NFR=1,SLEN=4,IVAL=0,ERR=0
 frame[0] READ 2 bytes
 0000  80 03 -- -- -- -- -- --  -- -- -- -- -- -- -- --  |..              |
10:35:43.429055 usbus0.5 SUBM-BULK-EP=00000081,SPD=HIGH,NFR=1,SLEN=0,IVAL=0
 frame[0] READ 1024 bytes
10:35:44.302385 usbus0.5 DONE-BULK-EP=00000081,SPD=HIGH,NFR=1,SLEN=4,IVAL=0,ERR=0
 frame[0] READ 2 bytes
 0000  81 00 -- -- -- -- -- --  -- -- -- -- -- -- -- --  |..              |
10:35:44.302400 usbus0.5 SUBM-BULK-EP=00000081,SPD=HIGH,NFR=1,SLEN=0,IVAL=0
 frame[0] READ 1024 bytes
10:35:44.998488 usbus0.5 DONE-BULK-EP=00000081,SPD=HIGH,NFR=1,SLEN=4,IVAL=0,ERR=0
 frame[0] READ 2 bytes
 0000  80 09 -- -- -- -- -- --  -- -- -- -- -- -- -- --  |..              |
10:35:44.998505 usbus0.5 SUBM-BULK-EP=00000081,SPD=HIGH,NFR=1,SLEN=0,IVAL=0
 frame[0] READ 1024 bytes
10:35:45.635118 usbus0.5 DONE-BULK-EP=00000081,SPD=HIGH,NFR=1,SLEN=4,IVAL=0,ERR=0
 frame[0] READ 2 bytes
 0000  81 00 -- -- -- -- -- --  -- -- -- -- -- -- -- --  |..              |
10:35:45.635131 usbus0.5 SUBM-BULK-EP=00000081,SPD=HIGH,NFR=1,SLEN=0,IVAL=0
 frame[0] READ 1024 bytes
10:35:46.526167 usbus0.5 DONE-BULK-EP=00000081,SPD=HIGH,NFR=1,SLEN=4,IVAL=0,ERR=0
 frame[0] READ 2 bytes
 0000  80 19 -- -- -- -- -- --  -- -- -- -- -- -- -- --  |..              |
...
We stop usbdump with Ctrl-C and look at what we obtained after pressing each key.
a:
 frame[0] READ 2 bytes
 0000  80 01
SPACE:
 frame[0] READ 2 bytes
 0000  81 00
b:
 frame[0] READ 2 bytes
 0000  80 03
SPACE:
 frame[0] READ 2 bytes
 0000  81 00
c:
 frame[0] READ 2 bytes
 0000  80 09
SPACE:
 frame[0] READ 2 bytes
 0000  81 00
d:
 frame[0] READ 2 bytes
 0000  80 19
So each key press produces 2 bytes.
For the letters a, b, c and d the first byte is 0x80.
The second byte is a bitmap: each bit is 1 if the corresponding dot is pressed
and 0 otherwise.
For example, d is made of dots 1, 4 and 5, so the second byte is
0x01 + 0x08 + 0x10 = 0x19.
For SPACE the first byte is 0x81 and the second byte is 0x00.
I will now repeat the tests with the other keys and buttons to map all the values:
| Key | Byte 1 | Byte 2 |
|---|---|---|
| Braille dots 1-6 | 0x80 |
pressed keys bitmap |
| BACKSPACE | 0x82 |
0x40 |
| SPACE | 0x81 |
0x00 |
| ENTER | 0x83 |
0x00 |
| Scroll Wheel Button | 0x8B |
0x06 |
| Scroll Wheel Right | 0x8B |
0x01 |
| Scroll Wheel Left | 0x8B |
0x00 |
| Thumb key 1 PREVIOUS | 0x84 |
0x01 |
| Thumb key 2 BACK | 0x84 |
0x02 |
| Thumb key 3 ADVANCE | 0x84 |
0x04 |
| Thumb key 4 NEXT | 0x84 |
0x08 |
Braille dots 1-6 can be pressed simultaneously with BACKSPACE, SPACE, and ENTER. In these cases, the bytes sent are as follows:
| Key + dots 1-6 | Byte 1 | Byte 2 |
|---|---|---|
| BACKSPACE | 0x82 |
0x40 | pressed keys bitmap |
| SPACE | 0x81 |
0x00 | pressed keys bitmap |
| ENTER | 0x83 |
0x00 | pressed keys bitmap |
Some key combinations may not be transmitted to the laptop.
For example, ENTER + 1 and ENTER + 4 control the speech synthesizer’s volume
by decreasing or increasing it, respectively.
Other combinations may be ignored.
For example, when BACKSPACE + SPACE are pressed together, SPACE is ignored
and only the BACKSPACE code, 0x82 0x40, is sent.
If BACKSPACE + SPACE + 1 are pressed, SPACE is still ignored, and the bytes
sent are 0x82 0x41.
Sending data from FreeBSD to the Apex
The next step is to send characters from the laptop keyboard to the Apex and make the corresponding Braille dots rise on the display.
Test 1: Writing plain text (failed)
My first attempt was to write text directly to the device:
% echo "a b c d" > /dev/cuaU0The test failed. No Braille dots rose on the display.
I suspected that I needed to translate the characters into Braille cell patterns and follow the device’s communication protocol. I could not find public documentation for the protocol at the time.
Before purchasing the device, I had contacted the manufacturer’s technical support to ask whether they could provide documentation or software to help developers implement device drivers. I explained that this was a non-commercial project and that all the work would be freely available online as open-source software.
I did not receive a reply, so I decided to continue with the information available to me.
Test 2: Trying Windows (failed)
I also tried using the device on Windows with the official driver supplied for the Apex. My plan was to connect it to a screen reader and inspect the data exchanged with the device.
It is important to configure the Apex in Screen Reader Terminal mode, selecting USB Client rather than USB Serial, which is the mode I use on FreeBSD.
After more than a day of attempts, I could not get the Apex working with either NVDA or Narrator, with or without BRLTTY and liblouis.
Eventually, I discovered that Windows assigned the device to COM3, but the connection was immediately lost. Since I have not used Windows regularly for almost 25 years, I temporarily gave up on this approach. Nevertheless, investigating this communication remains an interesting task to revisit in the future.
Test 3: Sending Braille cells using the documented protocol (successful)
I asked for help on social media, and someone suggested looking at the protocol documentation in BRLTTY.
I had considered this possibility before, but at first I looked in the wrong
directory of the BRLTTY source tree, and I did not find any protocol
documentation.
Later I found the right one: the braillenote/ directory contains a file
documenting the protocol.
I noticed some differences between the protocol documentation and the key codes I had observed while testing input from the Apex. The results in the previous section are similar to, but not identical to, those described in the protocol. One possible explanation is that the documentation covers a family of devices rather than the Apex specifically.
However, the protocol documentation contains exactly the information I needed to send data to the display.
The message must begin with two bytes, ESC and B, followed by one byte
representing the Braille dot pattern for each cell.
In other words, each byte encodes which of the eight possible dots should
be raised in a cell.
I first tried sending a single cell from the FreeBSD terminal:
% python3.12 -c 'open("/dev/cuaU0","wb",0).write(bytes([0x1b,0x42,0x01])+bytes(31))'Success!
The command sends ESC B, followed by 0x01 for the first cell
(dot 1, representing a in English Grade 1 UEB),
and 31 zero bytes for the remaining cells.
The Apex raises the top-left dot of the first cell and lowers all the dots of the remaining 31 cells.
Next, I sent the Braille patterns for abcde:
% python3.12 -c 'open("/dev/cuaU0","wb",0).write(bytes([0x1b,0x42,0x01,0x03,0x09,0x19,0x11])+bytes(27))'This worked too.
The first five cells displayed abcde, while the remaining 27 cells were
cleared.
Finally, I sent the Braille patterns for Hello World, FreeBSD!:
% python3.12 -c 'open("/dev/cuaU0","wb",0).write(bytes([0x1b,0x42,0x20,0x13,0x11,0x07,0x07,0x15,0x00,0x20,0x3a,0x15,0x17,0x07,0x19,0x02,0x00,0x20,0x0b,0x17,0x11,0x11,0x20,0x03,0x20,0x0e,0x20,0x19,0x16])+bytes(5))'In English UEB Grade 1, the text is represented by the following Braille cells.
Capital letters are preceded by the capital indicator {6}.
H {6}{125} e {15} l {123} l {123} o {135} SPACE {}
W {6}{2456} o {135} r {1235} l {123} d {145} , {2} SPACE {}
F {6}{124} r {1235} e {15} e {15} B {6}{12} S {6}{234} D {6}{145} ! {235}
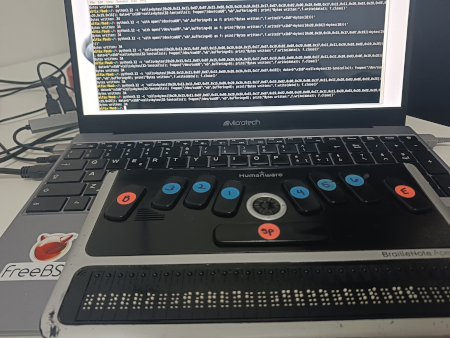
The successful tests confirm that I can send raw Braille cell patterns from FreeBSD to the Apex over its USB serial interface. They also provide a starting point for implementing the output side of a native FreeBSD driver.
Querying the display capabilities
The protocol also describes a special message consisting of ESC followed
by ?.
The Apex should respond with three bytes: 0x86, the number of status
cells, and the number of text cells.
Before running this test, I configured the initial state of the serial
device, /dev/cuaU0.init:
# stty -f /dev/cuaU0.init 38400 cs8 -parenb -cstopb raw -echoThen I sent the query and read the reply:
% python3.12 -c 'with open("/dev/cuaU0","r+b",buffering=0) as f: f.write(b"\x1b?"); data=f.read(3); print("Reply:", [hex(b) for b in data])'The device returned the expected response:
Reply: ['0x86', '0x0', '0x20']This indicates that the Apex reports zero status cells and 32 text cells.
There is one important detail.
In my tests, the same command could block indefinitely when the serial port
was not configured as above.
Setting only raw -echo, or only the speed to 38400, was not enough.
With usbdump(8) I saw that the ESC ? message is sent to the device, but in
the blocking case no reply arrives.
I have not yet determined why this configuration is necessary for the query to work, even though sending Braille cell data works without it. This behavior needs further investigation.
Troubleshooting
Sometimes, when the laptop and the Apex are powered on, sending data from the Apex to the laptop always works, but the first time bytes are sent from the laptop to the Apex, it raises random dots and then freezes, ignoring all subsequent writes.
The following sequence works for me.
Set the mode of cuaU0:
# stty -f /dev/cuaU0.init 38400 cs8 -parenb -cstopb raw -echoThis setting is not permanent. It must be repeated after the device is reattached or the system is rebooted.
Query the device:
# python3.12 -c 'with open("/dev/cuaU0","r+b",buffering=0) as f: f.write(b"\x1b?"); data=f.read(3); print("Reply:", [hex(b) for b in data])'
Reply: ['0x86', '0x0', '0x20']
Lower all the dots on the 32 cells:
# python3.12 -c 'with open("/dev/cuaU0","wb",buffering=0) as f: print("Bytes written:",f.write(b"\x1bB"+bytes(32)))'
Bytes written: 34
After this, the Apex accepts and displays the data correctly.
A simple example with a:
# python3.12 -c 'with open("/dev/cuaU0","wb",buffering=0) as f: print("Bytes written:",f.write(b"\x1bB"+bytes([0x01])+bytes(31)))'
Bytes written: 34
Obviously, this problem and its solution need further investigation.
What comes next
Obviously, this is only the first step. Connecting the Apex to FreeBSD and exchanging raw bytes is very different from implementing a complete Braille subsystem. A proper Braille subsystem for FreeBSD would likely require several components, including a demonstration driver, integration with the virtual console, sysctl, a daemon, utilities, Braille translation tables, and manuals.
The goal of this initial work is therefore not to build the complete subsystem immediately, but to start from the lowest level: make the Apex communicate with FreeBSD, understand its protocol, and use that knowledge as a starting point for the future implementation.
The next step is to send and receive characters between the laptop and the Apex, probably using conversion tables. liblouis is available in the FreeBSD ports tree and could be an option. Eventually, a tool could be written to start and manage the communication.
Trying a Bluetooth connection could also be interesting, as an optional extra feature and not a priority.
Once communication is more reliable and a utility for testing and debugging the device is available, I plan to create a FreeBSD Wiki page documenting the work.
